Tutorial / Authenticating with the Twitter API for enterprise
OAuth 1.0a: how to obtain a user’s Access Tokens
To make a request on behalf of another user, you first need to obtain this user’s authorization. This is achieved via the 3-legged OAuth flow, during which you redirect a user to authorize your application and receive the user’s Access Token and Secret in exchange.
Note that user Access Tokens are uniquely generated for each single developer App; in other words, if you generate an Access Token for App A, this specific Access Token would not work for App B.
The 3-legged OAuth flow (also sometimes referred to as “Sign-In With Twitter”) typically involves three parties:
- The end-user or resource owner. In this case, this is the Twitter user on behalf of whom you want to make an API request.
- The client or third-party application. In this case, your Twitter developer App.
- The server or authorization server. In this case, Twitter.
The IETF describes the 3-legged OAuth flow as “a process for end-users to authorize third-party access to their server resources without sharing their credentials (typically, a username and password pair), using user-agent redirections.” For example, if you authorize Medium to access your account, Medium will be able to post Tweets on your behalf (such as sharing an article to Twitter).
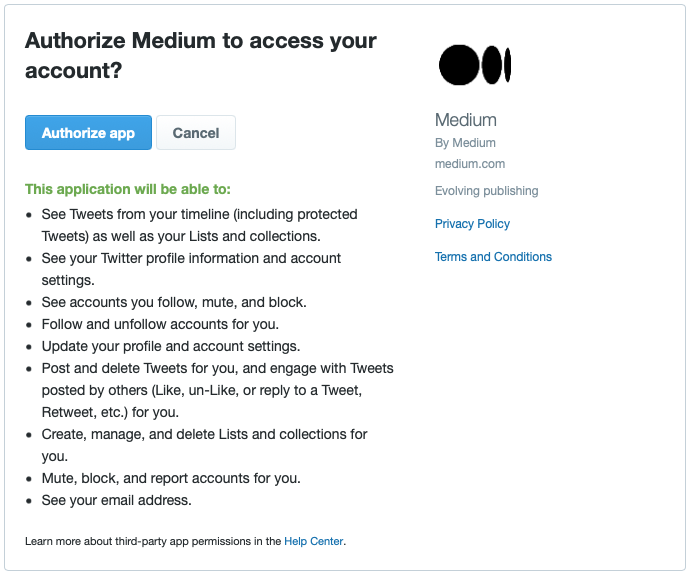
With the Twitter API, this 3-legged OAuth flow can be implemented using the following endpoints (see diagram and step-by-step example below):
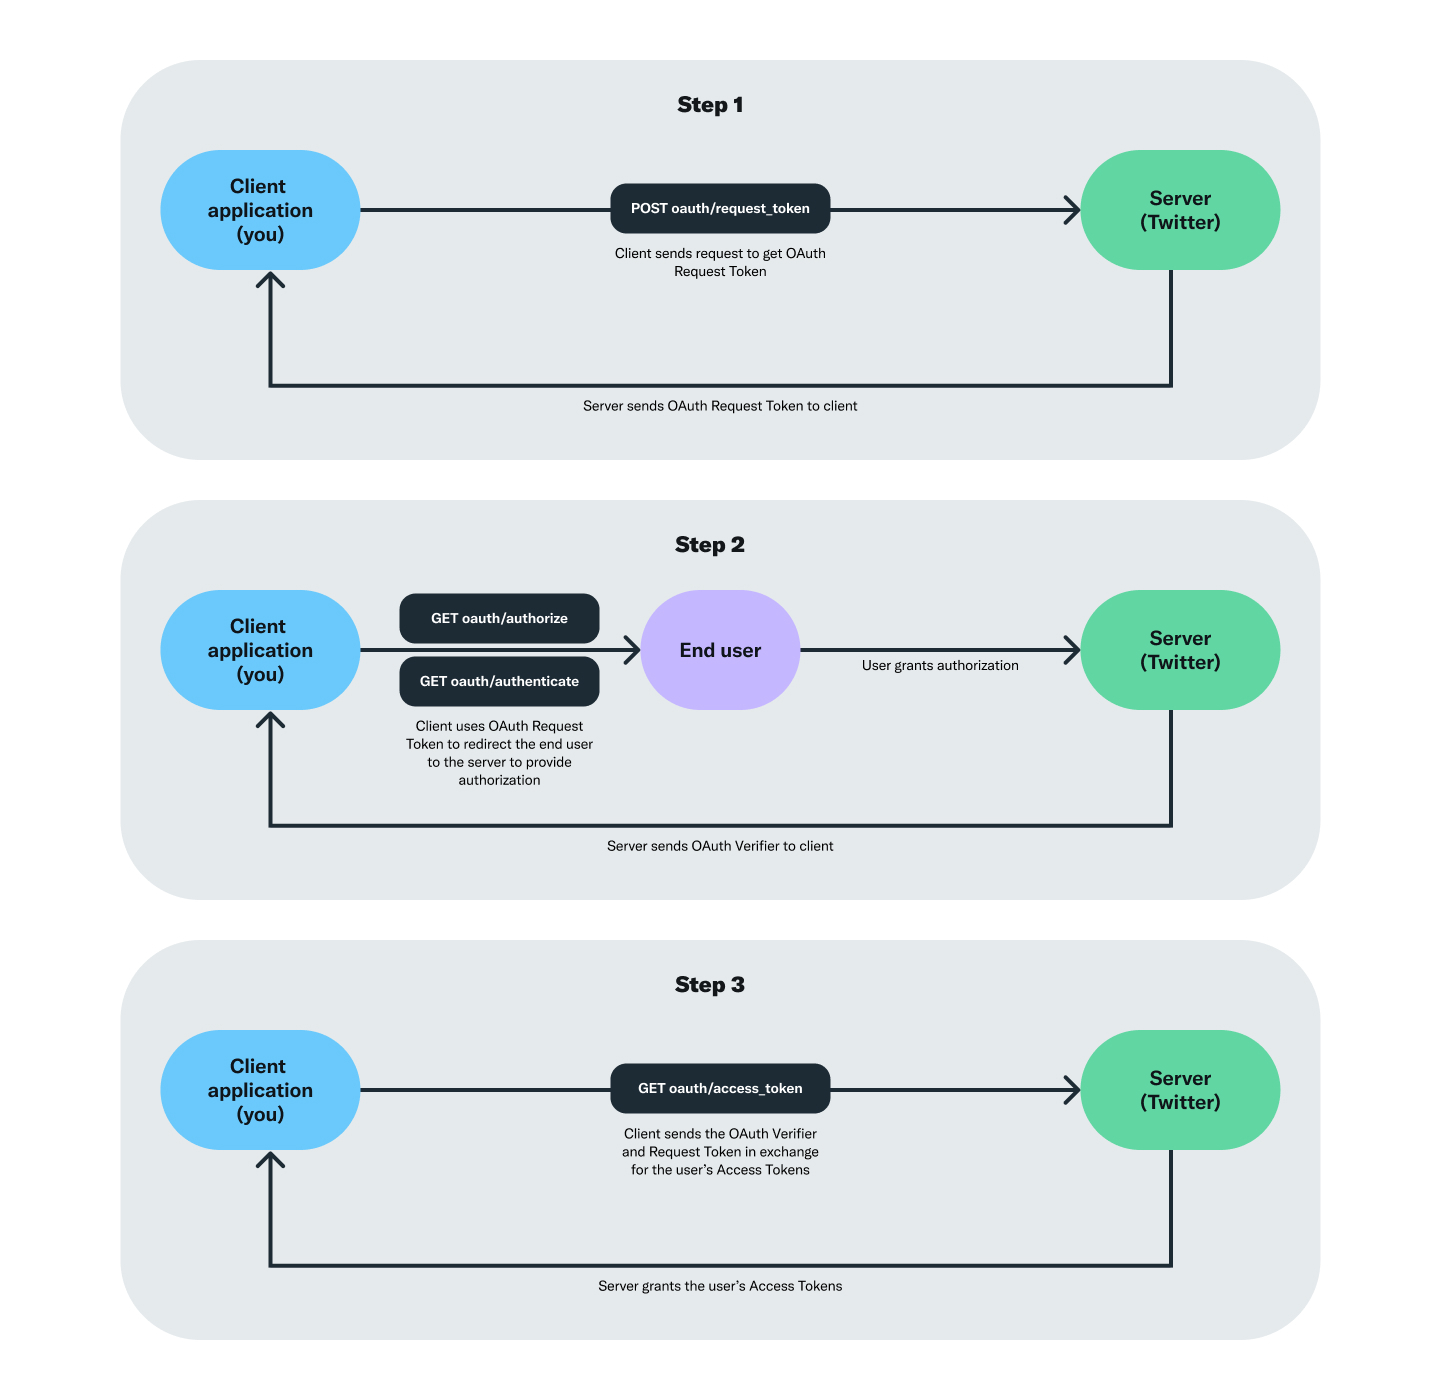
- POST oauth/request_token:
Use this endpoint to get an OAuth Request Token, which then allows you to request user authorization.
- GET oauth/authorize or GET oauth/authenticate:
Use the OAuth Request Token received in the previous step to redirect the user to authorize your developer App for access.
- GET oauth/authorize fulfills Section 6.2 of the OAuth 1.0 authentication flow. Desktop applications must use this method (and cannot use GET oauth/authenticate).
- GET oauth/authenticate is a replacement of Section 6.2 of the OAuth 1.0 authentication flow for applications using the callback authentication flow. The method will use the currently logged-in user as the account for access authorization unless theforce_loginparameter is set to true. This method differs from GET oauth/authorize. If the user has already granted your consumer application permission, the redirect will occur without the user having to re-approve your application. To realize this behavior, you must enable 3-legged OAuth under your App’s authentication settings.
- POST oauth/access_token:
Finally, this endpoint lets you exchange the OAuth Request Token for the user’s Access Tokens.
The diagram below illustrates the 3-legged OAuth flow for obtaining a user’s Access Tokens:
The following sample code demonstrates how you can implement the 3-legged OAuth flow to obtain a user’s Access Tokens:
Step-by-step example
The PIN-based OAuth flow is a version of the 3-legged OAuth process and is intended for applications that cannot access a web browser to redirect the user to after authorization takes place. Examples of such applications would be command-line applications, embedded systems, game consoles, and certain types of mobile apps. You can read more about PIN-based authorization in our documentation. For demonstration purposes, in the following example, we will use Insomnia REST as an API client to perform this flow.
Step 1 - Set up your Twitter developer App
First, check that 3-legged OAuth is enabled under your App’s authentication settings. You can manage these settings from within the Twitter developer portal.

In the same Settings section for your App, make sure to have a callback URL point to a web URL of your choice. This is where the user will be redirected after authenticating your App.
Finally, make sure to set your developer App’s permissions to the appropriate level before having any user(s) undergo the 3-legged OAuth flow. In the case that your App’s permission level is changed, any user Access Tokens already issued to that Twitter App must be discarded, and users will need to re-authorize your App in order for the tokens to inherit the updated permissions. App permissions are configured per developer App, within the App Settings section in the Twitter developer portal. You can read more about App permissions in our documentation.
Step 2 - Obtain an OAuth Request Token
Send a request to the POST oauth/request_token endpoint to receive an OAuth Request Token. In the next step, you will use the OAuth Request Token you obtained to redirect the user to authorize your developer App for access.
- Make sure to set the
oauth_callbackparameter tooobunder the "Query" tab.
The term "oob" means out-of-band OAuth. The user still visits Twitter to login or authorize the app, but they will not be automatically redirected to your application upon approving access. Instead, they will see a numerical PIN code, with instructions to return to the application and enter this value.
- Under the "Auth" tab, select OAuth 1.0 and input your developer App’s API Consumer Key and Consumer Secret. Leave the Token and Token Secret fields blank.
- Under the "Header" tab, set
Content-Typetoapplication/json.
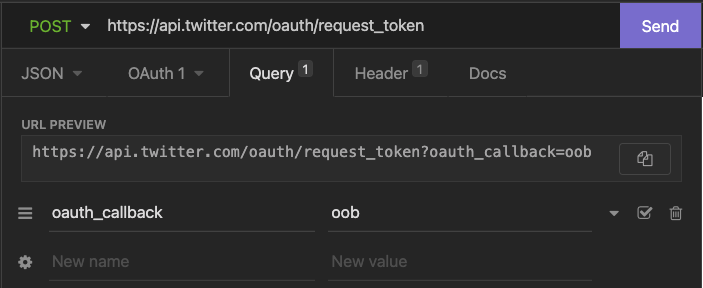
This request will return a response such as the following. At this stage, the oauth_token returned is the token of interest.
oauth_token=CbMNwAAAAAABR5q-AAABfCx8gKk&oauth_token_secret=fJpfWrIyEIgpCqHdhsycXgrzwlrGPFaR&oauth_callback_confirmed=true
Step 3 - Redirect the user to request authorization
Use the oauth_token received in the previous step and the following URL to redirect the user to authorize your developer App for access. Make sure to replace $OAUTH_TOKEN with the oauth_token obtained in Step 2 (don’t include the $ symbol).
https://api.x.com/oauth/authenticate?oauth_token=$OAUTH_TOKEN
In this example, we would create this URL with the oauth_token obtained in the previous step:
https://api.x.com/oauth/authenticate?oauth_token=Ychp_wAAAAABR5q-AAABesot2J8
When opened in a browser, the above link will then redirect the user to a page that looks like this:
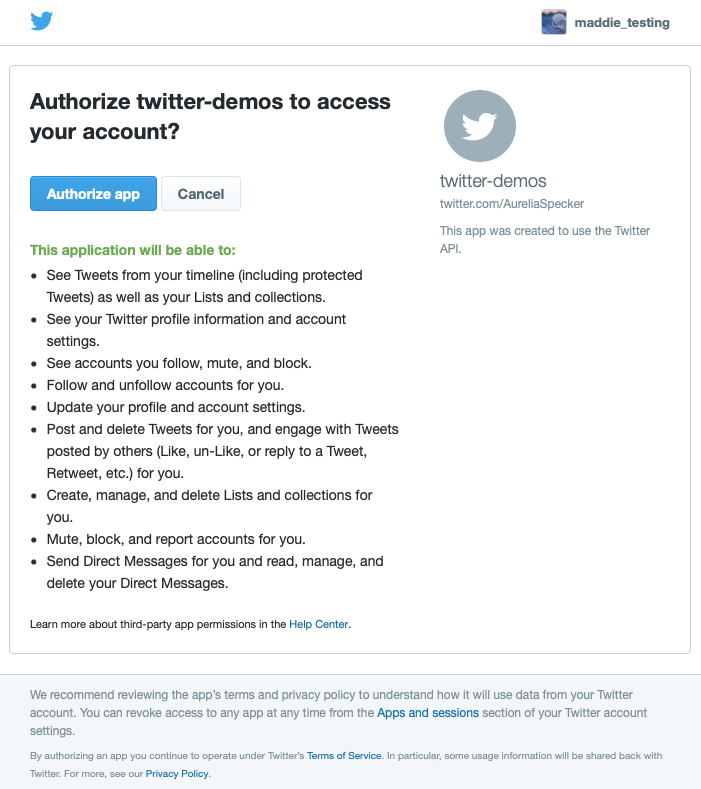
The user clicks “Authorize app,” and a PIN is generated:
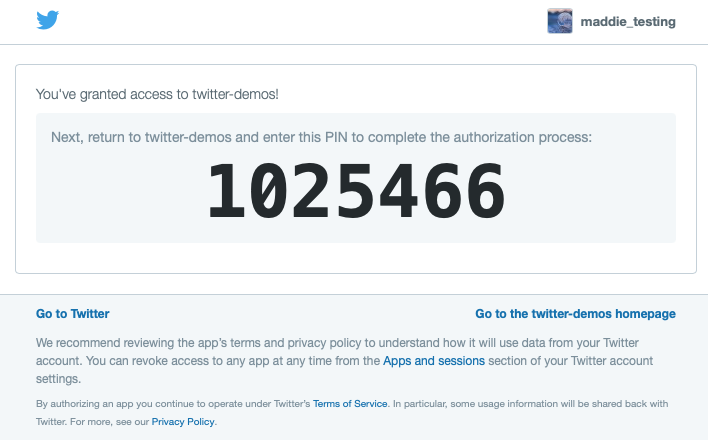
Step 4 - Exchange the OAuth request token and PIN (verifier) for the user’s Access Tokens
Send a request to the POST oauth/access_token endpoint.
Under the "Query" tab, make sure to set the
oauth_verifierparameter to the PIN number obtained by the user in Step 3 and theoauth_tokenparameter to the oauth token obtained in Step 2.Under the "Auth" tab, select OAuth 1.0 and input your developer App’s API Consumer Key and Consumer Secret. Leave the Token and Token Secret fields blank.
Under the "Header" tab, set Content-Type to application/json.
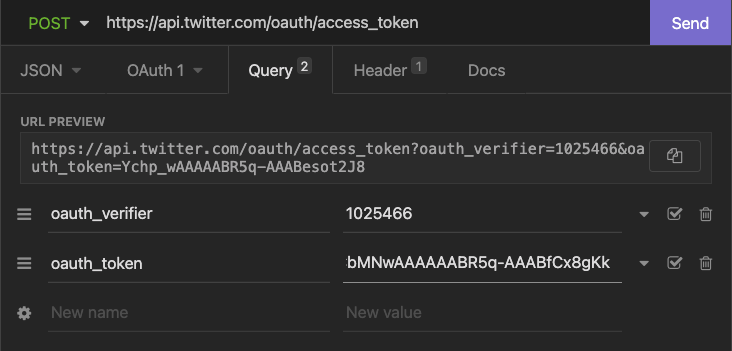
This will return a string containing the authenticating user’s oauth_token and oauth_token_secret parameters. These are the access tokens required for OAuth 1.0a user context authorization.
Now that you have the user’s Access Token and Secret, you can send these as part of any OAuth 1.0a authorization request that you are making on behalf of this user.
If you need to store a user’s Access Tokens, make sure to do so securely and keep the following elements in mind:
Restrict access to the database in such a way that the Access Tokens are only readable by the owner of the tokens.
Restrict edit/write privileges to the database table for Access Tokens, which should be automated with the key management system.
Encrypt Access Tokens before storing these in any data stores.
When making a request with OAuth 1.0a you will need to send the following credentials:
The API Key and Secret belonging to your developer App
The Access Token and Secret belonging to the user on behalf of whom you are making the request
Information on how to generate an OAuth 1.0a HMAC-SHA1 signature for an HTTP request can be found in our documentation. Language-specific libraries are available to help with the creation and implementation of this process (for example, Requests with Python).
Additional information about the 3-legged OAuth flow is also available in our documentation.
Go to the next article - Getting started with authentication, example implementations, and troubleshooting tips
Go back to the tutorial homepage - Authenticating with the Twitter API for enterprise
Ready to build your solution?